Pickled vegetables are the perfect complement to any meat-heavy meal.
Unfortunately, they’re often time-consuming to make.
Once you learn how to pickle radish, you’ll solve this problem for good.
Pickled radish brines in a few hours in your refrigerator, and they’re ready to eat almost immediately.
Best of all, they stay good for several weeks.
How to Make Refrigerator Sweet Pickled Radishes
Since these radishes are stored in the refrigerator, you won’t need a water bath canner to make them.
But you will need clean and sterilized jars.
Equipment Needed
- 1 pint jar with lid
- Mandoline slicer or sharp knife
- Stainless steel pan
- Colander
- Canning funnel
- Ladle
- Jar lifter (optional)
Ingredients
- ½ pound radishes
- ½ cup white vinegar
- ½ cup sugar
- ¼ cup water
- 1 teaspoon canning salt
- 1 teaspoon mustard seeds
- ½ teaspoon black pepper (I used whole peppercorns)
Prep Time
30 minutes
Cook Time
10 minutes
Brining Time
At least 6 hours
Step 1: Choose Your Radish
You’ll need a bunch of fresh radishes for this recipe.
I am using a traditional red radish, as this type tends to be both big and really spicy.
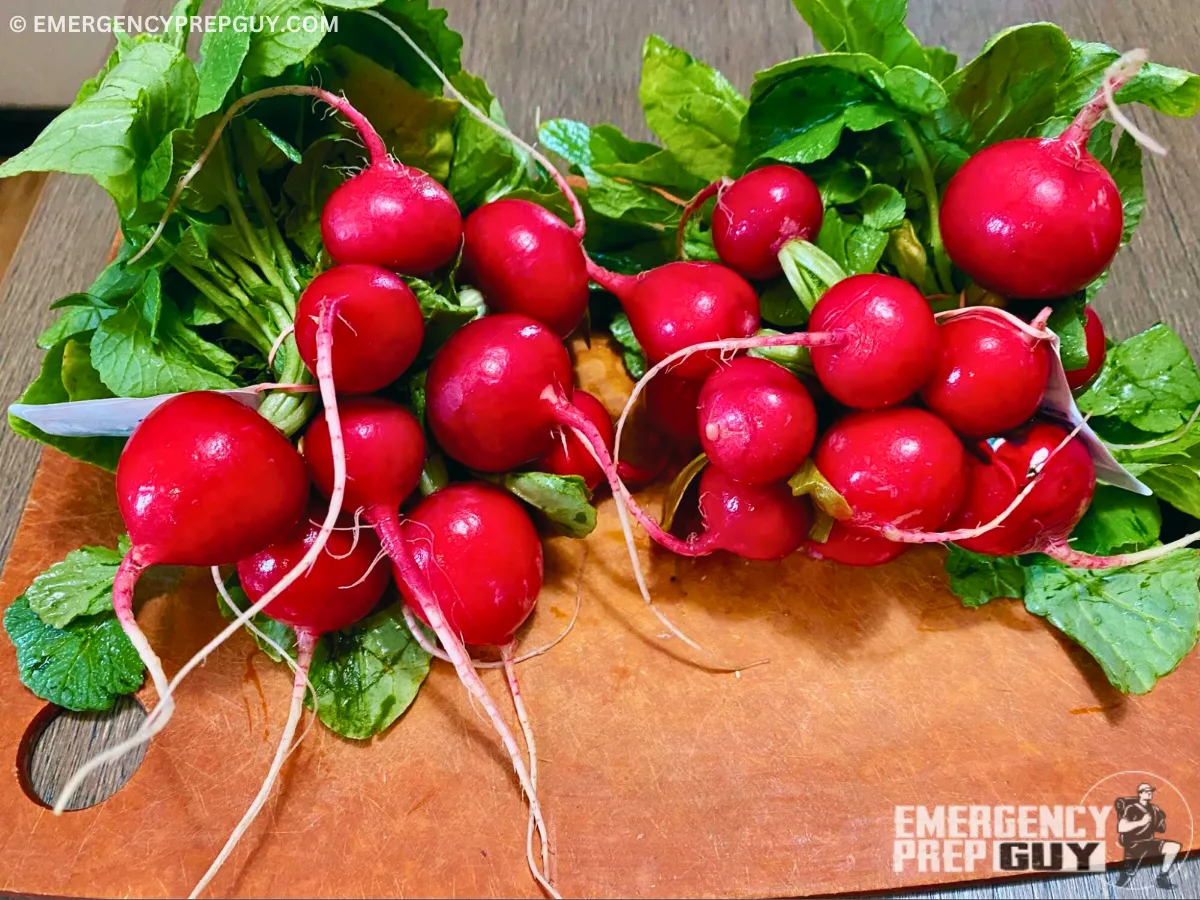
I find that mild radish varieties (such as watermelon radish) are too bland to stand up to the salt and vinegar in the brine.
If you prefer a less acidic product, however, you might look at using watermelon radish instead.
No matter the variety, look for radishes that are big, plump, and free of obvious insect damage.
I also set aside any produce that’s split or sunburned.
These radishes make for nice salad additions, but they’re not quite right for pickling.
Step 2: Sterilize Your Jar
We’re not canning this recipe, which means we don’t use a water bath to kill bacteria in the jars.
I like to sterilize any products I’m using for refrigerator pickled products.
That way, I know my product will last as long as possible.
Start by washing your jar in hot water and soap. Scrub out any residue you see. Then, bring water to a boil in a kettle or pot and splash that inside your jar.
This quick-clean method is usually enough to keep my bacterial problems away.

I use plastic lids for this project, and mine are often reused. I wash the lids and splash them with boiling water, too.
Step 3: Prepare Your Brine
Combine ½ cup white vinegar, ½ cup sugar, ¼ cup water, 1 teaspoon salt, 1 teaspoon mustard seed, and ½ teaspoon black pepper in a stainless steel saucepan.
Over medium-high heat, bring this liquid to a boil while stirring regularly.
Boiling vinegar can be hard to breathe, so ensure that you clear the air by opening a window or turning on the kitchen vent.
Step 4: Slice Your Radish
As your brine heats, prepare your radishes for the jars. Start by removing the stems and the ends from each radish.
Place the red parts in a colander and rinse them carefully to remove any remaining dirt and contaminants.
Cut the radish into very thin slices. I use a mandoline slicer like this one for projects like this, as it ensures I get uniform slices without a lot of fuss.
You could use a sharp knife instead.

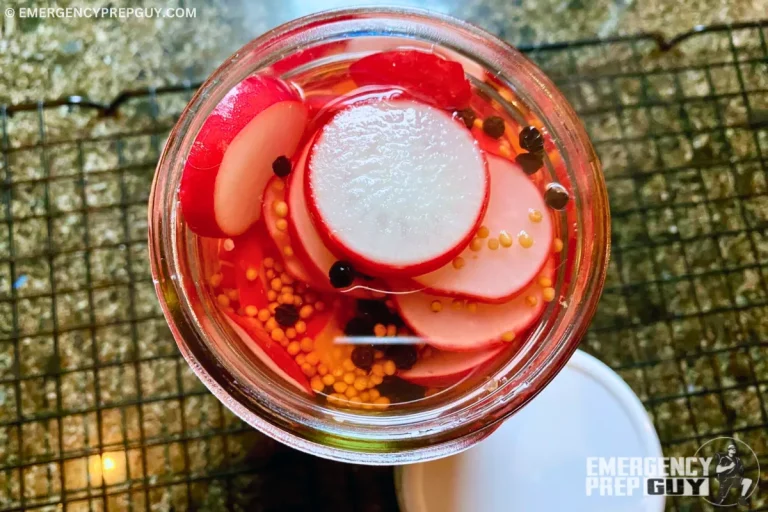
Step 5: Fill Your Jar
Once your radishes are sliced thin, place them in your prepared jar. I like to fill my jar about ¾ full without packing.
This preparation ensures that every slice in the jar will get touched by the brine, but I won’t need more liquid than I’ve prepared.
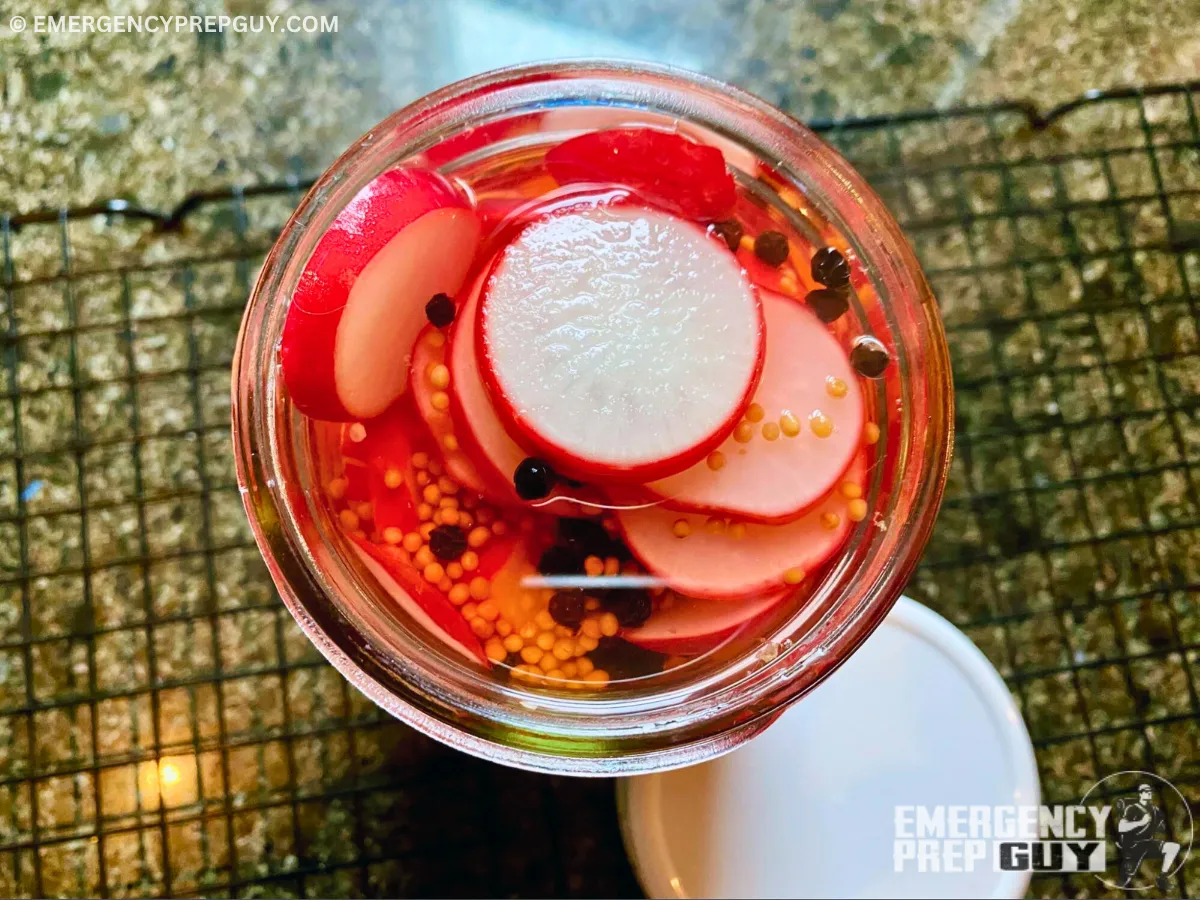
Screw down your plastic lid and adjust it until it’s tight enough to hold the steam inside without leaking.
Step 6: Let the Jar Cool at Room Temperature
Your jar will be really hot at this point, as it’s filled with boiling water.
Place it on a wire rack to cool for an hour. You’ll see the brine bubble between the slices, and air may accumulate near the top of the jar.
Allowing the jar to rest ensures it won’t break due to a temperature change from a deep freeze.
Step 7: Store the Jar in the Refrigerator
After an hour, place your prepared radish in the refrigerator. I like to put pickled products on the shelves and not inside the door.
This way, they’re not constantly getting warmed up when the door opens and closes.
Step 8: Let the Brine Develop
Your picked radishes need at least 6 hours to sit in the brine before you can eat them. I like mine to rest much longer.
The salt and vinegar in the brine need time to work into every part of your radish. Typically, I leave mine for at least 48 hours before trying them.
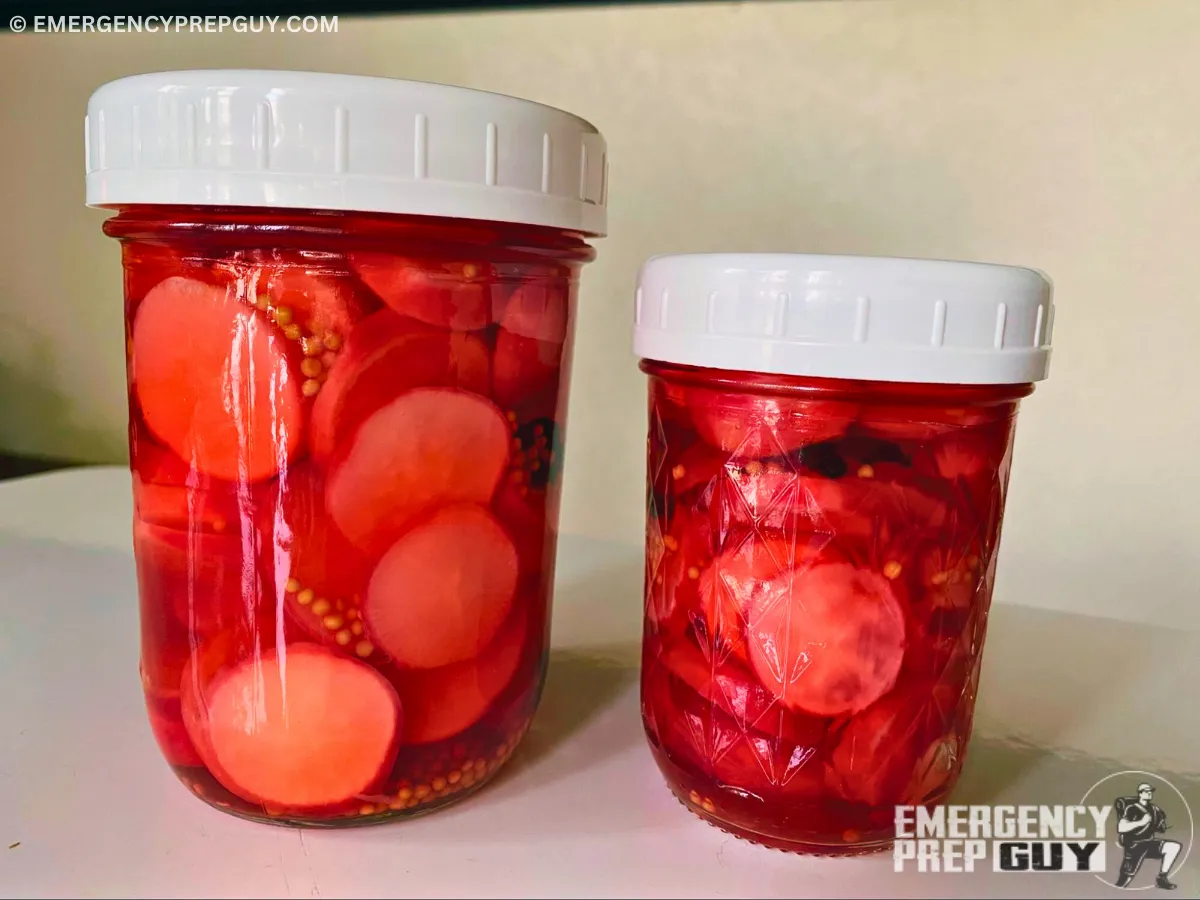
How Long Does Pickled Radish Last?
Ball developed this delicious recipe. The company says pickled radish is safe to eat for up to 4 months when stored in the refrigerator. Mine never lasts this long!
If you’ll have your radish jar in the refrigerator for more than a few weeks, it’s smart to shake it periodically. Radish sticking up out of the brine can dry out or develop mold.
Regular shaking ensures the product stays in contact with the preserving power of salt and vinegar.
Ideas for Using Sweet Pickled Radish
Pickled radish is a delightful item to have in your refrigerator. Here are some of my favorite ways to use it:
- Replace lettuce in sandwiches with pickled radish slices.
- Chop up pickled radish for your Easter egg salad.
- Garnish deviled eggs with pickled radish.
- Sprinkle pickled radish on the top of your next salad.
- Add radish slices to your next bowl of ramen.
- Dress up plain avocado toast with radish.
- Add pickled radish to burgers or tacos.
- Eat them straight from the jar for a quick pick-me-up.
- Add pickled radish to fried rice dishes.
- Use pickled radish to transform a grain bowl.
Equipment
- Mandoline slicer (Sharp knife)
- Jar lifter (Optional)
Ingredients
- ½ pound radishes
- ½ cup white vinegar
- ½ cup sugar
- ¼ cup water
- 1 teaspoon canning salt
- 1 teaspoon mustard seeds
- ½ teaspoon black pepper (or whole peppercorns)
Instructions
Choose Your Radish
- Select fresh, firm radishes—big, plump, and free of blemishes. Red radishes, known for their spicy bite, work best for this recipe. Avoid mild varieties like watermelon radish, as they may not hold up to the vinegar and salt brine. Remove any damaged or sunburned radishes—they’re better for salads than pickling.
Sterilize Your Jar
- While we’re not canning these pickled radishes, it’s important to sterilize the jar to ensure longevity. Wash the jar in hot water with soap, then fill it with boiling water from a kettle or pot. Let the jar sit for a few minutes, then drain it. Repeat this for the lid if it’s reusable. Using a jar lifter, carefully handle the hot glass.
Prepare Your Brine
- In a stainless steel pan, combine ½ cup white vinegar, ½ cup sugar, ¼ cup water, 1 teaspoon canning salt, 1 teaspoon mustard seeds, and ½ teaspoon black pepper. Over medium-high heat, bring the mixture to a boil, stirring regularly. Make sure to open a window or turn on the kitchen vent to clear the air, as boiling vinegar can be pungent.
Slice Your Radish
- While the brine heats up, clean and slice your radishes. Start by trimming off the ends and stems. Rinse them thoroughly in a colander. Then, slice the radishes thinly—aim for translucent slices. A mandoline slicer works wonders for even slices, but a sharp knife will do the job just fine.
Fill Your Jar
- Pack your thinly sliced radishes into the sterilized jar. I like to fill the jar about ¾ full, without packing them tightly, so the brine can reach every slice. This ensures the radishes are evenly pickled.
Pour the Brine
- Carefully pour the hot brine over the radishes, making sure they’re fully submerged. Use a ladle or canning funnel for a controlled pour. If needed, add more brine to cover the radishes completely. Screw on the lid, tightening it just enough to hold in the steam without leaking.
Let the Jar Cool at Room Temperature
- Allow the jar to cool at room temperature for about an hour. As it cools, you’ll see the brine bubble around the radish slices, and air may accumulate at the top. This resting period also prevents any breakage due to a sudden temperature change.
Store the Jar in the Refrigerator
- After an hour, place your jar of pickled radishes in the refrigerator. Store it on the shelves (not in the door) to ensure the brine stays cool and stable, without the temperature fluctuations that happen each time the door opens and closes.
Let the Brine Develop
- Let the radishes sit in the brine for at least 6 hours to allow the flavors to meld. The longer they rest, the better they taste—48 hours is ideal, but they’re perfectly good after a few hours. Shake the jar occasionally to ensure the radishes remain submerged and evenly pickled.
Notes
- Radish Varieties: While red radishes are ideal for this recipe due to their spicy bite, you can experiment with different varieties. If you prefer a milder pickled radish, watermelon radish or daikon can also be used, though they may absorb the brine less aggressively.
- Sugar: The sugar in this recipe balances out the acidity of the vinegar, giving the radishes a subtle sweetness. Feel free to adjust the sugar to taste depending on how sweet or tart you prefer your pickles.
- Customizing the Brine: This recipe calls for mustard seeds and black pepper, but pickled radishes are highly adaptable to various spices. You could experiment with garlic, coriander, or chili flakes for extra flavor.
- Brining Time: The longer the radishes sit in the brine, the more flavor they absorb. I recommend waiting at least 24 hours before eating, but they’re still perfectly edible after 6 hours.