
Canned goods are a staple for anyone looking to build a reliable food reserve.
They’re convenient, have a long shelf life, and can be a real lifesaver in an emergency.
But to make the most out of your canned food stash, proper storage is key.
Let’s take a look into how you can store your canned foods creatively, effectively and discreetly to ensure they stay safe, tasty, and ready when you need them.
9 Creative Storage Ideas For Organizing Your Canned Foods
Maximizing your storage space can be both fun and functional with these ingenious ideas for managing your canned goods.
1. Can Dispenser
Consider building a DIY Can Dispenser using a mounted, perplex-fronted unit from Ana White’s plans, this not only looks stylish but also lets you see your stock at a glance.
While this looks amazing, my only concern with it is the potential to damage cans as they have to drop from right up the top to the bottom when stocking initially.
2. Wire Baskets/Stackable Wire Baskets
Stackable wire baskets are perfect for those who want an easy setup without major DIY projects, while a sturdy behind-the-door organizer can help you utilize otherwise wasted space efficiently.

- Three stackable, foldable wire baskets
- Handles and labels for easy organization
- Durable, rust-resistant carbon steel design
3. Can Organizers

Putting can dispensers along pantry walls allows you to line up cans without taking up too much space. Plus, choosing an organizer that has an automatic rotating system makes employing a FIFO (first in, first out) strategy easy.

- Corrosion-resistant, non-slip, and stable
- Space-saving, automatic can roll design
- Decorative ferric art style
4. Skinny shelves
Skinny shelves are great as you can always find somewhere in your house to put them where they don’t take up too much room.

- Strong, rust-resistant steel; 600lbs capacity
- Adjustable shelves; fits narrow spaces
- Easy, tool-free assembly in 15 minutes
5. DIY Vinyl Gutters
If you are great at DIY you could mount vinyl gutters in closets to provide an affordable, high-capacity storage solution.
6. Upcycling Soda Boxes
If on a tight budget you can get creative by upcycling soda boxes into dispensers, which help you rotate your stock by restocking from the back effortlessly.
7. Slim Slide-Out Pantry Shelves
Slim slide-out pantry shelves are ideal for canned goods, especially when placed beside appliances.

- Compact 3-tier wood shelf, 34” tall
- Black, easy-care wipe-clean surface
- Highly rated kitchen cart
8. Pantry Steps
Classic pantry steps improve visibility, making it easy to see what you have in stock and also grab cans from the back.
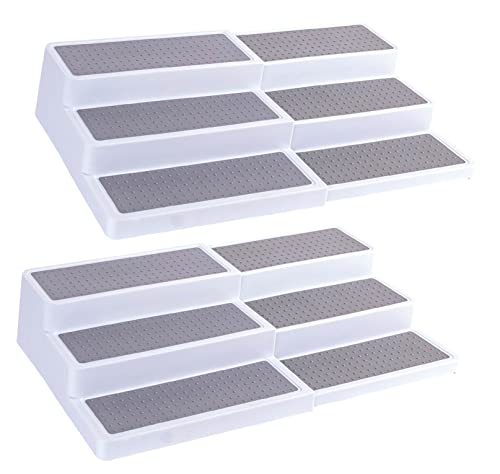
- 3-tier expandable rack maximizes space
- Anti-slip surface keeps items secure
- Versatile use for spices, cans, more
9. Lazy Susans
Wide magazine holders can serve as dividers or hold small cans in compact pantries, while oversized corner lazy Susans make the most of those tricky corner spaces.
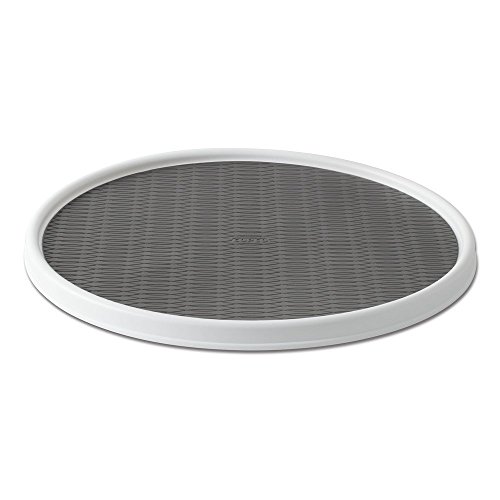
- Non-skid, rimmed 18" lazy Susan
- Revolving design for easy access
- Ideal for kitchens, bathrooms, crafts
With these innovative storage solutions, you can keep your canned foods organized, accessible, and ready for any situation.

- Steel-reinforced, 360° rotating can organizer
- Holds 20 cans; 2-tiered space saver
- Clear ABS design for easy visibility
These are some of many excellent ways to help store and rotate your canned goods to improve their accessibility and longevity.
More DIY Canned Food Storage Ideas
If you are handy on the tools, why not DIY your own canned food dispenser.
Below are some of my absolute favorite ideas to get you started. These are ideal when you really want to take your can storage to the next level :-).
100 Can Rotator
This new build, crafted from cedar wood and recycled one-by-fours, features several key enhancements: a third section to accommodate a wider variety of cans, increased height for added storage capacity, and a tighter width to prevent cans from getting stuck.
Jacob likes the open-faced design for easy access and visibility, making can management a breeze.
The rotator is designed to hold about 100 cans!
42 Can Dispenser
Starting with a measurement of a 30-inch space in his closet, he carefully cuts a quarter-inch plywood sheet into strips for the walls and dividers.
Bob assembles the frame with top and bottom pieces, using clamps to secure the dividers while drilling holes for screws.
To ensure proper can spacing, he cleverly employs boxes as spacers and addresses any curvature in the plywood by anchoring the dividers to the back.
He also constructs a support system that allows the cans to roll out easily and cuts angled pieces to push them outward.
After gluing the bottom blocks, Bob adds additional components to prevent cans from falling out.
Once the dispenser is fully assembled, he installs it on the wall with a stud finder and cabinet screws for added stability.
After loading the dispenser with cans, he tests the design, revealing how this clever solution has transformed his pantry organization, creating more space and efficiency.
Can Dispenser With Doors
Two-Tiered Can Rotating System
To fit their pantry space, they start with a sturdy board measuring 44 inches wide by 48 inches tall.
Using 1×4 and 1×2 boards, they craft a lip that securely holds the cans in place. The importance of accurately measuring can sizes is emphasized to account for slight variations between different brands.
The assembly process involves pre-drilling, gluing, and screwing the pieces together for enhanced stability. A power sander ensures a snug fit for the cans.
After completing the lower tier, the creator secures the top tier with angled screws for added support.
Trim pieces are then incorporated to facilitate the can rolling mechanism. To finish, they plan to fill any holes and paint the unit, providing a polished look.
An organized storage system not only looks good but also helps you keep track of your supplies.
How to Store Large Volumes of Canned Food (Discreetly)
For preppers needing to store large volumes discreetly, utilizing hidden under-furniture storage is an excellent idea.
This method allows you to keep substantial amounts of canned goods or other supplies out of sight without sacrificing living space or drawing attention.
Hidden Under-Furniture Storage Ideas
1. Under-Bed Drawers:
- Custom Built Drawers: Install deep drawers underneath your bed. These can be designed to blend seamlessly with the bed frame, making them virtually unnoticeable.
- Rolling Storage Bins: Use flat, rolling bins that can slide under the bed. Opt for ones with covers to keep dust out and maintain a tidy appearance.
2. Sofa and Couch Storage:
- Storage Sofas: Invest in sofas that come with built-in storage compartments underneath the seating cushions.
- DIY Modifications: If you’re handy, modify your existing couch by adding a hinged seat that lifts to reveal storage space.
3. Coffee Tables and Ottomans:
- Dual-Purpose Furniture: Choose coffee tables or ottomans with hollow interiors. These pieces can store a significant number of canned goods while serving their usual function.
- Hidden Compartments: Some furniture comes with secret compartments designed specifically for discreet storage.
4. False Bottom Cabinets and Bookshelves:
- Elevated Shelves: Build shelves with a false bottom to create a hidden layer of storage beneath displayed items like books or decor.
- Cabinet Kick Spaces: Utilize the kick space under kitchen cabinets by converting it into a pull-out drawer.
5. Staircase Storage:
- Under Stairs Cupboards: The space beneath a staircase can be transformed into a sizable storage area with hidden doors or drawers.
- Stair Drawers: Convert individual stairs into pull-out drawers for additional discreet storage.
6. Floor Storage:
- Trap Doors: Install trap doors in less frequented rooms or closets that lead to shallow floor storage.
- Raised Floors: Create a raised floor in a room with removable panels, providing a large hidden area underneath.
Tips for Storing Canned Foods Long Term
Beyond creative and attractive ways of storing canned food, if you are stockpiling canned goods for emergencies, you need to employ best practices to extend the life of your canned goods.
Why Proper Storage of Canned Foods Matters
You might think that canned foods are indestructible, but that’s not entirely true. Storing them correctly is crucial for several reasons:
- Preserving Nutritional Value and Taste: Over time, canned foods can lose their nutritional content and flavor if not stored properly.
- Preventing Spoilage and Contamination: Poor storage conditions can lead to rust, leaks, or even bacterial growth.
- Saving Money: By reducing the risk of spoilage, you won’t have to toss out expired or unsafe food—saving you money in the long run.
Importance of Stock Rotation
First In, First Out (FIFO) Method
- Rotate Your Stock: Always use the oldest cans first to ensure nothing goes to waste.
- Easy Access: Place newer cans behind older ones when restocking.
Labeling and Dating
- Mark the Dates: Use a permanent marker to note the purchase or expiration date on each can.
- Create a Log: Keep an inventory list to track what you have and what you need.
Storage Aids
- Use Shelving: Sturdy shelves can help you organize cans efficiently.
- Can Organizers: These can make rotation easier and save space.
Optimal Storage Conditions
To get the most out of your canned foods, pay attention to the environment where you store them.
Temperature
- Keep It Cool: Aim for a storage temperature between 50°F and 70°F (10°C to 21°C). Higher temperatures can cause the food to spoil faster.
- Avoid Heat Sources: Keep cans away from ovens, water heaters, or any appliances that emit heat.
Humidity
- Stay Dry: Moisture can lead to rust, which compromises the can’s integrity.
- Combat Humidity: If you live in a humid area, consider using dehumidifiers or moisture absorbers in your storage space.
Light Exposure
- Darkness is Your Friend: Prolonged exposure to light can degrade the food inside the cans.
- Shield Them: Store cans in opaque containers or areas that don’t get direct sunlight.

Choosing the Right Storage Location
Selecting the perfect spot for your canned food stash can make all the difference in preserving its quality and shelf life. You’ll want to find a place in your home that’s cool, dry, and away from direct sunlight.
Basements and pantries are often ideal because they usually maintain a consistent temperature and are shielded from the elements.
But be cautious about where you store your cans. Areas like garages or attics might seem convenient, but they often experience extreme temperature fluctuations throughout the year.
These changes can negatively affect the food inside the cans, leading to spoilage or reduced nutritional value.
If your home doesn’t have a suitable space, don’t fret. You can make adjustments to improve the conditions.
For example, consider insulating a closet or a section of your basement to keep the temperature steady. Using a dehumidifier can help control moisture levels if the area is prone to humidity.
Remember, the goal is to mimic the optimal storage conditions as closely as possible to ensure your canned goods stay safe and tasty for as long as possible.
Understanding Shelf Life
Understanding the shelf life of your canned foods is crucial for effective prepping.
“Best by” dates indicate when the product is at its peak quality, while “use by” dates are more about safety, so make sure to consume your goods before then.

According to the University of Minnesota high-acid foods like tomatoes typically last between 12 to 18 months, whereas low-acid items such as beans and meats can remain good for 2 to 5 years when stored properly.
I personally believe this is very conservative and many people online will say you can get a much longer shelf life than that providing you are storing your cans correctly.
Always inspect your cans for signs of swelling, leaks, or rust, and trust your senses, if something smells or looks off after opening, it’s best to discard it.
Regularly rotating your stock using the FIFO (First In, First Out) method will help ensure you use older cans before they reach the end of their shelf life.
Checking for Spoilage
Safety first! Always inspect your cans and their contents.
- Examine the Can: Look for swelling, dents, leaks, or rust.
- Upon Opening: If the food has an unusual odor, color, or texture, don’t risk it.
- Disposal: If in doubt, throw it out—but safely. Wrap the spoiled food and dispose of it so that animals or children can’t get to it.

Tips for Extending Shelf Life
A little care goes a long way in extending the shelf life of your canned foods.
But it also helps to select the longest lasting canned foods!
Handle your cans with care by avoiding drops or dents that can compromise their integrity and safety.
Additionally, don’t stack your cans too high, as excessive weight can damage the cans at the bottom, potentially leading to leaks or rust.
Make it a habit to regularly inspect your stockpile every few months to ensure that all your canned goods remain in good condition and to address any issues before they become serious problems.
Common Mistakes to Avoid
Avoiding common pitfalls is essential to keep your canned goods in top shape.
First, make sure to store your cans away from chemicals such as cleaning supplies or gasoline fumes, as these can contaminate your food and compromise the cans’ integrity.
Also, don’t ignore the presence of pests; regularly check for signs of rodents or insects that could damage your stockpile.
Finally, don’t skip inventory checks.
Without regular monitoring, you might miss expired or damaged goods, which can lead to food waste and potential safety hazards.

Safety Considerations
Your health is paramount, so keep these simple tips in mind when storing your cans for a long time.
Beware of Botulism by always inspecting cans for bulges, leaks, or unusual odors, as consuming spoiled canned food can lead to serious illness.
Keep It Clean by regularly cleaning your storage area to prevent mold and bacteria growth, ensuring a safe environment for your food supplies.
Also remember, Disaster Preparedness is crucial, so secure your storage to protect your canned goods from earthquakes, floods, or other emergencies, ensuring your food remains safe and accessible when you need it most.
Stay Prepared With Canned Foods!
Properly storing your canned foods isn’t just about stacking cans on a shelf, it’s about creating a reliable food reserve that you can count on for years to come.
By paying attention to your storage conditions, organizing your cans efficiently, and staying vigilant about safety, you’ll ensure that your canned goods are ready whenever you need them.


